
Angry Bird (Red)

Background
- Set your foreground color to a light blue.
- Select the Gradient tool
- Drag from top to bottom
- This should make your Background layer look like this...
- [Enter] or click on another tool to set the gradient.


Body
Body shape
Insert a new layer, call it "body'.


Make sure primary color = black, and set secondary color to a dark red.

Select the Shapes tool - then set it to the Ellipse shape.

- Change the thickness to 5.
- Set it to draw outline and fill.

Draw a circle/oval for the body - leave room at the top and left for feathers and tail.

feathers
Insert a new layer above. Draw and rotate an oval something like this...


Duplicate the layer.


Move it over with the Move tool. When you're done, CTRL+D to get rid of the selection (dotted outline).


Merge the feather layers together, and rename the layer "feather"


Select the Eraser tool - change the size to about 30.


Select one of the feather layers and erase (with a bit of an angle).
Then select the other feather layer and erase some of that feather oval.

So far you should have something like this...

Chin
Select the Line/Curve tool - and set the thickness to 5.


Make sure the body layer is active.
Draw a line and then push/pull circles to create a curved line for the chin, connecting with both sides of the body.


- Set the primary color to a grey/tan color.
- Select the Paint Bucket tool.
- Click in the chin area.
- [Enter] to apply/set the fill.


Eyes
Insert a new layer. Name it "eye".

Colors: set to default

Set the Ellipse shape tool. It should still be set to thickness 5, Fill & Outline.

Draw the outline for the right-side eye.

Click off to set the shape.
Now set the Ellipse set to draw fill - foreground color black.

Draw a pupil and position it where you want it...and click off to set it.

- Duplicate the eye layer
- Use the Move Selected Pixels tool to move it over so they're overlapping.
- CTRL+D or [Enter] to get rid of the dotted outline.


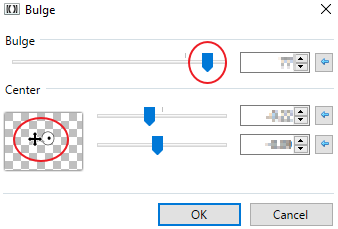
Select one eye layer at a time and go to Effects>Distort>Bulge - change the shape of each eye so it's more cartoon-like.


Eyebrows
Insert a new layer 'eyebrow'.

Select the Trapezoid Shape tool (it should still be set it to draw Fill Only).

Draw a trapezoid shape (pull it down first, then rotate and resize it so it's above one of the eyes like this...


- Duplicate the layer.
- Then go to Layers menu and Flip Horizontal.
- Then move both eyebrows and rotate them so they meet in the middle.


Tail
Insert a new layer, call it "tail".

With the Trapezoid Shape tool, click and drag down, then rotate ...


Click off to set the shape, then draw 2 more trapezoids at different angles.

Go to Effects>Distort>Twist... and play with the center and amount/direction til you have an interesting tail...


Move the tail layer under the body and move it where you like.


Beak
top beak
- Insert a new layer, name it "beak".
- Set your colors so primary = black, secondary = yellow
- Select the Shape tool - set the shape type to Triangle. Change it to Outline & Fill. Should still be thickness 5.


- Draw a triangle shape and rotate it a bit, something like this to start.
- Then go to Effects>Distort>Bulge and make it more interesting of a shape.


bottom beak
- Insert a new layer, call it beak 2.
- Change the secondary color to an orange
- Drag a triangle.


- Go to Effects>Distort>Bulge again and play with the settings to get a nicely-shaped bottom beak.
- Then move it under the top beak layer
- Move/rotate it into position.


Spots
Insert a new layer - call it 'spots'. Make sure it's above the body layer or you won't see anything!

Make sure your primary color is still black.
Use the Shape tool - Ellipse - change it so it's drawing Fill only.

Draw ovals and rotate/squish them - around the eyes, at least 4 ovals.

Double-click on the spots layer or use the Layer Properties button and reduce opacity to about 100.


