
Holidays

Table
Insert table
- Type out "Holidays" at the top
- [Enter] to the next line.
- Go to the Insert tab and insert a 3 x 4 table.


Table text
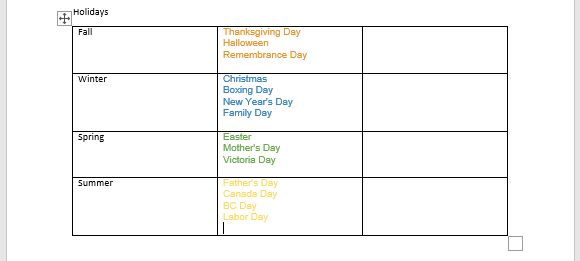
In the first column type out the seasons as follows:

Select the holidays list below and copy (CTRL+C).
Thanksgiving Day
Halloween
Remembrance Day
Christmas
Boxing Day
New Year's Day
Family Day
Easter
Mother's Day
Victoria Day
Father's Day
Canada Day
BC Day
Labor Day
Paste them (CTRL+V) after the table.

Select the text and drag (or cut and paste) into the middle column
Select all the text on the page (CTRL+A) and Clear Formatting.

We need to get rid of the empty/extra line in each table cell at the bottom...

Click in the empty lines and Backspace to delete them.

You can see there's extra lines after the table. If you click on the Show/Hide button you will see the extra Enters with the backwards "P" symbol.


Click after the table and Backspace or Delete to get rid of the extra lines. You should have just one line after the table like this...

Hide the formatting.

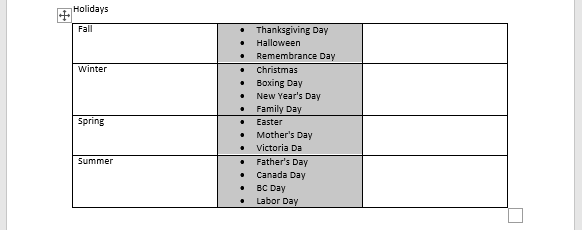
Select the 2nd column text and make them bullets

Format Text
default font
Select all the text (CTRL+A) and set to the font type to Juice ITC and size to 20


headings
- Select the page heading and pump it up to size 48
- Select the first column and pump up to size 36.

style
Also add the first shadow style to the page heading and the first column.

Then make the headings bold using the tool button (or CTRL+B)


center page heading
Center the page heading.


Spacing
Bottom margin
Hover over the Ruler where the margin stars (white/grey), when you get a 2-pointed arrow and it says Bottom Margin, pull down to the 1/2" mark.


line spacing
Select all the text (CTRL+A) and set Line Spacing to 1.0"


paragraph spacing
With everything still selected, go to Layout and set to 12pt before & after...


Now click on the bottom arrow to open more Paragraph options.

In the window that opens up, look for the shaded box under Spacing...

Click in the box 2x so the box is empty (not shaded or checked).

Say OK and now you should have space between the bullets as well.

Column widths
Change column widths under Layout as follows (so middle column is wider but outside ones are the same).
- Column 1: set width to 2"
- Column 2: set width to 2.5"
- Column 3: width to 2"

Before:

After:

Borders & Shading
no border
Select the table and go to Borders and set to No Border


Shading
Select the 2nd row (move your mouse beside the row - click when it's a white arrow like this)

Go to the Shading button on the Home toolbar and choose a dark color (one of the top colors or go to More Colors).

Now you have 2 options...
Option #1:
Alternating dark/light of same color

Option #2:
Each row a different dark color

Font colors
- Option #1: Select the text in the dark rows and change the font color to white.
- Option #2: all table text change to white; make page heading colorful, 2 letters of each row color


Pictures
- Click on the empty line after your table
- Go to Insert > Pictures ... and choose Online Pictures...


- In the window that opens, search for something and [Enter]
- First uncheck the box for Creative Commons only
- Then click on Filter

- First select Clip Art
- Then do it again and select Square


You should now see (2) for Filter

Select a 3-4 pictures you think will look nice against your colored background and Insert.

Click on each picture and make it smaller - go to Picture Format and set Height to 1"


Drag a picture into the table to see if it's transparent.
- If it's transparent and you like it, Delete the other pictures
- if it's not transparent, Delete it and try another one
- Delete any extra pictures you're not using for that season after your table


Repeat for the other seasons, inserting a transparent clip art picture, setting the Height to 1".

Alignment
cell alignment
Select the entire table and go to the Layout tab ...
set the Alignment to center for both horizontally and vertically...


